Step-by-Step Guide
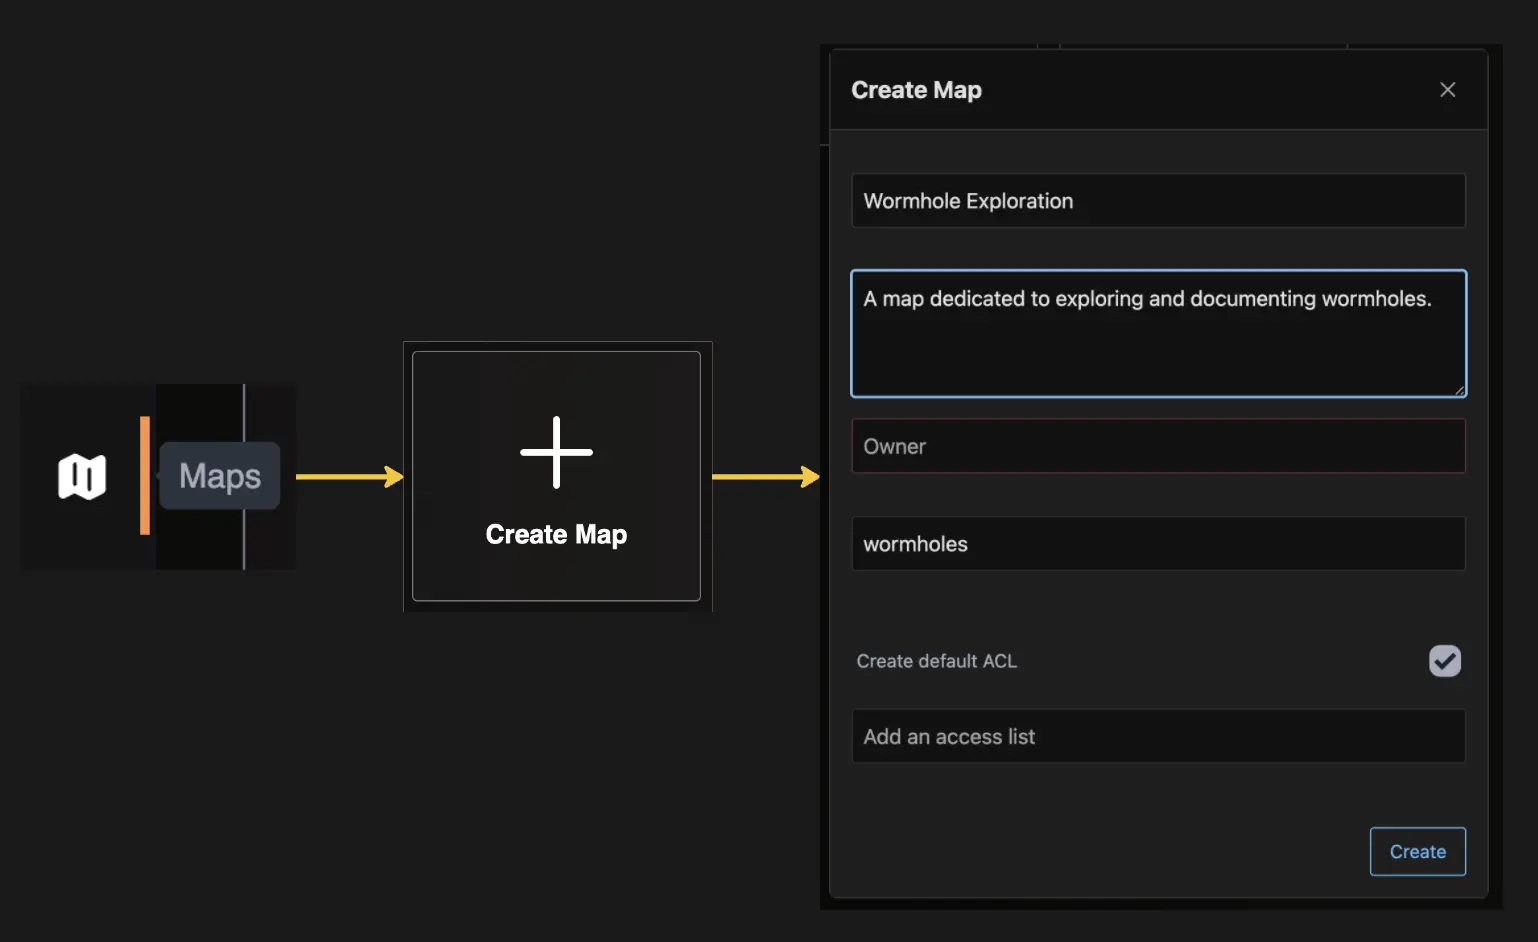
1. Access the Maps Page

- Log In: Ensure you are logged into the application with your credentials.
- Navigate to Maps Page: Click on the “Maps” tab on the left navigation bar.
- Click on “Create Map” item with a plus sign: This will take you to the map creation modal, you will see a form with several fields that need to be filled out.
2. Fill Out the Map Details
You will see a form with several fields that need to be completed. Here is a detailed explanation of each field:
Name
-
Field:
Name - Description: Enter a unique and descriptive name for your map.
Public Description
-
Field:
Public description - Description: Provide a brief description that will be visible to other users. This can include the purpose of the map or any relevant details.
Owner Character
-
Field:
Select a map owner - Description: Select the character that will own and manage this map. This is typically your main character in the game.
Scope
-
Field:
Select a map scope -
Description: Define the scope of the map. The scope determines the types of connections and systems that will be included in the map. Choose one of the following options:
- wormholes: Connections created from/to wormholes only.
- stargates: Including known system gates on the map.
- all: Includes all types of connections and systems.
- none: No connections; the map will be empty initially.
Access Lists
-
Field:
Add an existing access list - Description: Manage who can access and edit the map. You can create and assign access lists to control permissions.
3. Additional Options
Allow Only Tracked Characters
-
Checkbox:
Allow Only Tracked Characters - Description: Check this box if you want to restrict access to users with non-tracked characters. This will ensure that only tracked characters have access to the map.
Create Default Access List
-
Checkbox:
Create default access list - Description: Check this box if you want to automatically create a default access list. This list will grant basic access to specified users or groups.
4. Save and Create Map
- Review the Information: Double-check all the entered information to ensure accuracy.
- Click “Create”: Once all fields are filled out and reviewed, click the “Create” button to finalize the creation process.
Example
Here’s an example of how you might fill out the form:
- Name: Wormhole Exploration
- Description: A map dedicated to exploring and documenting wormholes.
- Owner: JohnDoe
- Scope: wormholes
- Access Lists: Empty
- Create Default Access List: Checked
Conclusion
By following these steps, you can easily create a new map tailored to your needs. Ensure all information is accurate and complete before saving. If you have any questions or need further assistance, please contact our support team.
Fly safe, The Wanderer Team